2021年2月27日土曜日

タイムコーダーを作る【1】 RaspberryPi4+I2Cで液晶LCD1602を使う時は 3.3V版を使う

GNSS/GPS電波時計

■前提とする環境

RaspberryPi4
RaspberryPi W/WH
Python3
液晶3.3V版のHD44780互換 LCD1602/LCD1604/LCD2004等
I2C/IICアダプター(HD44780互換インターフェース)


 先の記事RaspberryPiをGPS/GNSSユニットで時刻合わせると組み合わせればGPS/GNSS電波時計が作れます。


■キャラクター液晶LCD1602をRaspberyPiで使うポイント

ポイントをまとめました。

1. 3.3V版のLCDを選定する

2. コントラスト調整は四角が薄く見える状態にする

3. I2Cを有効化する #raspi-config

4. pythonのライブラリはi2clcdを使用する


■3.3V版のLCDを選定する

RasberyPiのIOは3.3Vで動作ですので、LCDも3.3V版を使用するのが簡単です。
5V版のLCDディスプレイで問題になるのは、バックライトで使われているLEDが、4V以上無いと光らないところです。また、厳密にはレベルコンバーターを使用しないといけない。ということで回路が若干複雑になります。手抜きをするには回路を小さくするには、3.3V版を選定するのがより簡単です。

同時にI2Cのインターフェースボードも購入します。

この記事はこちらのデバイスを使用しました。


AliExpressならこのあたり。

LCD1602/I2C https://ja.aliexpress.com/item/32326489466.html

3.3V版と5V版とI2Cインターフェースが入手できます。値段が安い。ただ、やはり輸送に時間がかかる。2週間ぐらいは覚悟しましょう。忘れたころにやってきますw。

もし購入されるなら、おともだち紹介割引クーポンをAliExpressからもらいましたのでこちらが利用できます。

なんと2500円相当プレゼントです。ただし、初体験初購入の方に限ります。

AliExpressの$24(約2540円)の割引クーポン https://a.aliexpress.com/_mqxRKVZ

わたしも$5もらえます:p

実は、AliExpressでもLCDを注文していたがなかなか来ないので、急いでいたこともありAmazonで大好きなHiletGoから購入しました。こっちは2日で来た。やっぱはえー


■ピンアサインと配線

I2Cモジュールと液晶モジュールをはんだ付けします。
ここで注意が必要なのですが、液晶モジュールの背面には液晶のフレームの足が飛び出ています。I2Cモジュールを取り付けるとVCCラインと接触するような位置になります。そのうち削れてショートしRasberyPiのレギュレーター回路を破壊するので対策します。

フレームの足を一度伸ばし折り曲げておきます。この時液晶を破壊しないように注意します。
今回、I2Cモジュールの裏面にコルクシートを両面テープで貼り付けました。

RaspberryPi I2Cモジュール
3.3V[1]---------[2]VCC
SDA[3]---------[3]SDA
SCL[5]---------[4]SCL
-     [7]
GND[9]---------[1]GND

■コントラスト調整は四角が黒く見える状態にする

私は最初ここで大ハマリしました。
出荷状態ではコントラスト設定が0%となっているために、文字データが正常に出力されていても何も表示されません。プログラムが正常に動作していてもわからないので、プログラムを何度も見直す羽目に陥ります。

時計回りにめいっぱい回すとコントラスト100%となり白い四角が表示されます。


コントラスト100%

ボリュームを反時計回りに回していき、白い四角が黒くなったあたりに調整しておくと文字がはっきり見えます。
コントラスト80~90%ぐらいの間で視認できるようになります。
視認可能範囲が結構狭いのでこの調整は必須です。

コントラスト85%
黒い四角が見える状態に調整すると文字が浮かび上がってきます。文字が見えてからお好みの濃さに調整します。


■I2Cを有効化する #raspi-config

RaspberyPiは最初I2Cが有効化されておらず、そのまま使用するとファイルオープンエラーが発生します。次のようにしてI2Cを有効化します。
#raspi-config


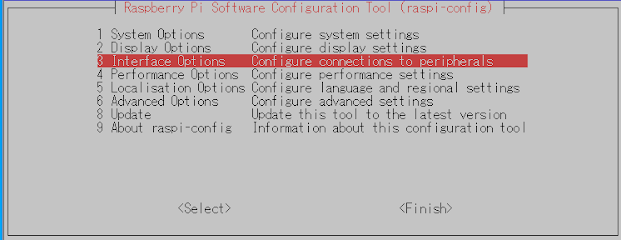
[Interface Options]を選びます


つづいて[I2C]を選択します。


[はい]を選びます


■ pythonのライブラリはi2clcdを使用する

今回は、ライブラリi2clcdを使用しました。らくちんです。

Python3から1602をI2Cで簡単に利用できます。

先にパッケージをインストールします。

#pip3 install i2clcd


サンプルプログラムはこちら

お約束の"HelloWorld"


[lcd1602test.py]

import i2clcd
lcd = i2clcd.i2clcd()
lcd.init()
lcd.print("Hello World")

python3で実行

$python3 lcd1602test.py


日時秒マイクロ秒を表示するプログラム

GNSSで時刻合わせしているので実はGPS電波時計です

[lcd1602clock.py]

# -*- coding: utf-8 -*-
# !/usr/bin/python
import time
import datetime
import i2clcd

lcd = i2clcd.i2clcd()
lcd.init()

lcd.clear()
now = datetime.datetime.now()
strymd = now.strftime("%Y/%m/%d")
lcd.return_home()
lcd.print(strymd)


while(True):

    #### current time
    now = datetime.datetime.now()
    strymd = now.strftime("%H:%M:%S.%f")
    lcd.move_cursor(1,0)
    lcd.print(strymd)

    time.sleep(0.1)

マイクロ秒表示できるのにスリープ0.1秒という…w
だって、読めないんだもんw
あ。。。日にちも更新しませんので、24時過ぎても日にちは変わりませんwww


python3で実行

$python3 lcd1602clock.py


このサンプルを実行するとわかるのですが、1/10秒の桁でも表示が追い付かず読めません。液晶の応答速度が悪いためですが、表示の書き換えに300mS必要で、実際のところ3fpsぐらいが限界になります。

続きの記事:

タイムコーダーを作る【1】 RaspberryPi4+I2Cで液晶LCD1602を使う時は 3.3V版を使う <イマココ
タイムコーダーを作る【2】RaspberryPi4+I2C+OLEDで表示高速化
タイムコーダーを作る【3】RaspberryPi4+I2CネイティブOLEDを使う 


■i2clcdリファレンスマニュアル  (2019 SiYu Wu版)

以下文中のlcd.は、i2clcdのオブジェクトとする。

初期化

i2clcd(i2c_bus=1, i2c_addr=0x27, lcd_width=16)

オブジェクトを生成する。ライブラリを初期化する。

i2c_bus: システム上のI2Cバス番号

i2c_addr:I2Cバス上のアドレス 

#i2cdetect -y 1 で確認出来たI2Cのアドレスを指定する

lcd_width:液晶の横の文字数LCD2002なら20を指定する

使用例:

lcd = i2clcd.i2clcd()

lcd = i2clcd.i2clcd(i2c_bus=1, i2c_addr=0x28, lcd_width=20)

init()

LCDを初期化する。 

使用例 :

lcd.init()

基本操作

print(text)

textで指定された文字列を現在のカーソル位置に表示する。 

print_line(text,line,align='LEFT')

textで指定された文字列を指定された行の指定された位置(左寄せ、右寄せ、センタリング)に表示する。

clear()

 画面を消去する

return_home()

カーソル位置を画面左上ホームポジションに移動する。 

 move_cursor(line,column)

カーソルを指定された位置に移動する。 

 line: 行番号 0で上段 1で2段目

 column:カラム番号 0で左端 LCD1602なら15で右端

座標を表現するのに(x, y)とすることが多いのですが、LCD類は(line, column)→(y, x)と表記することが多いようです。 


■i2clcdのソースコード

i2clcdの使い方はソースコードを読んでいただけるとわかるかと思います。

i2clcd [__init.py__]全ソースコード

"""
LCD1602/2002/2004 I2C adapter driver for Raspberry Pi or other devices

Copyright (C) 2019 SiYu Wu <wu.siyu@hotmail.com>. All Rights Reserved.

"""

__author__ = 'SiYu Wu <wu.siyu@hotmail.com>'

import smbus
import time

name = 'i2clcd'

# Note for developers
#
# I2C byte:   [H ------------------------ L]
#             [    data    ]  [  ctrl_bits ]
# PCA8574:    P7  P6  P5  P4  P3  P2  P1  P0
# LCD1602:    D7  D6  D5  D4  BT  E   R/W RS

# Define some device constants
LCD_DAT = 0x01  # Mode - Sending data
LCD_CMD = 0x00  # Mode - Sending command

# LINE_1 = 0x80   # LCD RAM address for the 1st line
# LINE_2 = 0xC0   # LCD RAM address for the 2nd line
# LINE_3 = 0x94   # LCD RAM address for the 3rd line
# LINE_4 = 0xD4   # LCD RAM address for the 4th line
LCD_LINES = (0x80, 0xC0, 0x94, 0xD4)

# Character code for custom characters in CGRAM
CGRAM_CHR = (b'\x00', b'\x01', b'\x02', b'\x03', b'\x04', b'\x05', b'\x06', b'\x07')


class i2clcd():
    def __init__(self, i2c_bus=1, i2c_addr=0x27, lcd_width=16):
        """
        initialize the connection with the LCD

        i2c_bus:    the smbus where the LCD connected to,
                    for Raspberry Pi, it should be 1 or 0 (depending on the model)
        i2c_addr:   I2C address of the adapter, usually 0x27, 0x20 or 0x3f
        lcd_width:  the width of the LCD, e.g. 16 for LCD1602, 20 for LCD2002/2004
        """
        self._bus = smbus.SMBus(i2c_bus)
        self._i2c_addr = i2c_addr
        self._lcd_width = lcd_width

        self._backlight = True
        self._last_data = 0x00

    def _i2c_write(self, data):
        """write one byte to I2C bus"""
        self._last_data = data
        self._bus.write_byte(self._i2c_addr, data)

    def _pluse_en(self):
        """proform a high level pulse to EN"""

        time.sleep(0)
        self._i2c_write(self._last_data | 0b00000100)
        time.sleep(0)
        self._i2c_write(self._last_data & ~0b00000100)
        time.sleep(0)

    def write_byte(self, data, mode):
        """write one byte to LCD"""

        data_H = (data & 0xF0) | self._backlight * 0x08 | mode
        data_L = ((data << 4) & 0xF0) | self._backlight * 0x08 | mode

        self._i2c_write(data_H)
        self._pluse_en()

        self._i2c_write(data_L)
        self._pluse_en()

        time.sleep(0.0001)

    def init(self):
        """
        Initialize the LCD
        """

        # setting LCD data interface to 4 bit
        self._i2c_write(0x30)
        self._pluse_en()
        time.sleep(0.0041)
        self._i2c_write(0x30)
        self._pluse_en()
        time.sleep(0.0001)
        self._i2c_write(0x30)
        self._pluse_en()
        time.sleep(0.0001)
        self._i2c_write(0x20)
        self._pluse_en()

        self.write_byte(0x28, LCD_CMD)    # 00101000 Function set: interface 4bit, 2 lines, 5x8 font
        self.write_byte(0x0C, LCD_CMD)    # 00001100 Display ON/OFF: display on, cursor off, cursor blink off
        self.write_byte(0x06, LCD_CMD)    # 00000110 Entry Mode set: cursor move right, display not shift
        self.clear()

    def clear(self):
        """
        Clear the display and reset the cursor position
        """
        self.write_byte(0x01, LCD_CMD)
        time.sleep(0.002)

    def set_backlight(self, on_off):
        """
        Set whether the LCD backlight is on or off
        """
        self._backlight = on_off
        i2c_data = (self._last_data & 0xF7) + self._backlight * 0x08
        self._i2c_write(i2c_data)

    def set_cursor(self, cursor_visible, cursor_blink):
        """
        Set whether the cursor is visible and whether it will blink
        """
        cmd = 0x0C + cursor_visible * 0x02 + cursor_blink * 0x01
        self.write_byte(cmd, LCD_CMD)

    def move_cursor(self, line, column):
        """
        Move the cursor to a new posotion

        line:   line number starts from 0
        column: column number starts from 0
        """
        cmd = LCD_LINES[line] + column
        self.write_byte(cmd, LCD_CMD)

    def shift(self, direction='RIGHT', move_display=False):
        """
        Move the cursor and display left or right

        direction:      could be 'RIGHT' (default) or 'LEFT'
        move_display:   move the entire display and cursor, or only move the cursor
        """
        direction = 0x04 if direction == 'RIGHT' else 0x00
        cmd = 0x10 + direction + move_display * 0x08
        self.write_byte(cmd, LCD_CMD)

    def return_home(self):
        """
        Reset cursor and display to the original position.
        """
        self.write_byte(0x02, LCD_CMD)
        time.sleep(0.002)

    def write_CGRAM(self, chr_data, CGRAM_solt=0):
        """
        Write a custom character to CGRAM

        chr_data:     a tuple that stores the character model data
        CGRAM_solt:   int from 0 to 7 to determine where the font data is written

        NOTICE: re-setting the cursor position after calling this method, e.g.

        lcd.write_CGRAM((0x10, 0x06, 0x09, 0x08, 0x08, 0x09, 0x06, 0x00), 2)
        lcd.move_cursor(1, 0)
        lcd.print(b'New char: ' + i2clcd.CGRAM_CHR[2])
        """
        cmd = 0x40 + CGRAM_solt * 8
        self.write_byte(cmd, LCD_CMD)

        for dat in chr_data:
            self.write_byte(dat, LCD_DAT)

    def print(self, text):
        """
        Print a string at the current cursor position

        text:   bytes or str object, str object will be encoded with ASCII
        """
        if isinstance(text, str):
            text = text.encode('ascii')

        for b in text:
            self.write_byte(b, LCD_DAT)

    def print_line(self, text, line, align='LEFT'):
        """
        Fill a whole line of the LCD with a string

        text:   bytes or str object, str object will be encoded with ASCII
        line:   line number starts from 0
        align:  could be 'LEFT' (default), 'RIGHT' or 'CENTER'
        """

        if isinstance(text, str):
            text = text.encode('ascii')

        text_length = len(text)
        if text_length < self._lcd_width:
            blank_space = self._lcd_width - text_length
            if align == 'LEFT':
                text = text + b' ' * blank_space
            elif align == 'RIGHT':
                text = b' ' * blank_space + text
            else:
                text = b' ' * (blank_space // 2) + text + b' ' * (blank_space - blank_space // 2)
        else:
            text = text[:self._lcd_width]

        self.write_byte(LCD_LINES[line], LCD_CMD)
        self.print(text)


ありがとうSiYu Woさん
謝謝SiYu Wu!